Shriekwing
Guida in italiano qua!
Cliccate su Leggi Tutto per la guida completa in inglese!
Shriekwing Quick Tips in Castle Nathria
Phase One
-
All players should hide behind the same pillar when
 Earsplitting Shriek is cast.
 -
Move to the edge of the room when marked with
 Echolocation.
 -
Tanks need to use mitigation for the
 Exsanguinating Bite and should taunt after each one of these casts.
 -
Healers need to keep the raid healthy when the boss applies (Spell #344111) to the raid.
-
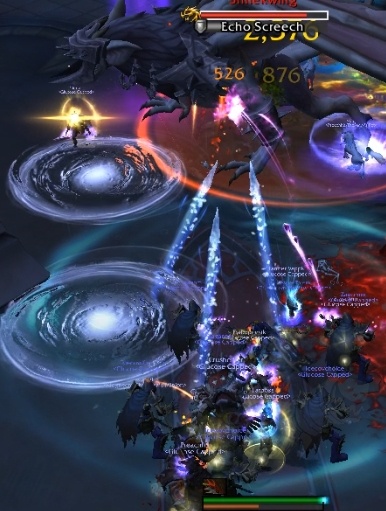
Bait the
 Echoing Screech towards an open area and then dodge the sonic rings the boss shoots out. (Heroic)
Phase Two
-
Stay 13+ yards away from the boss at all times.
-
Dodge the sonic rings that are bouncing around the room.
-
Use the pillars to create line of sight between you and the boss when she casts (Spell #340047).
Shriekwing Phase One Abilities and Strategy
Earsplitting Shriek
The encounter space has four pillars placed around the centre of the room. These pillars create line of sight which is used to counteract the bosses ![]() Earsplitting Shriek ability.
Earsplitting Shriek ability.
-
This ability is cast twice per phase. After a lengthy cast, all players that are in line of sight to Shriekwing will take a large burst of damage.
-
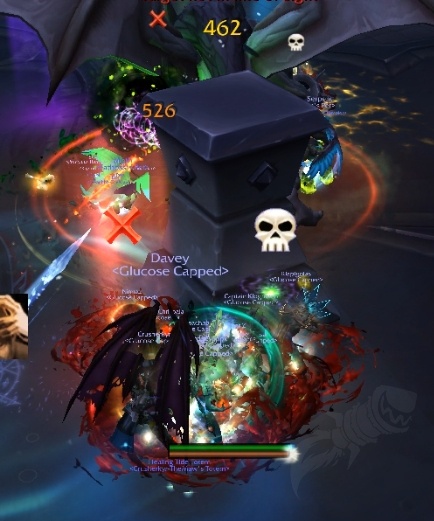
All players, regardless of their line of sight status, will be debuffed with an effect dealing moderate damage over 8 seconds. All players will also spawn a
 Sanguine Ichor pool at their location.
 -
Sanguine Ichor simply deals moderate damage every second to anyone who stands within it. These pools shrink with time.
The boss should be positioned between two pillars.
-
On the first cast of Earsplitting Shriek, all players should hide behind a single pillar and spawn all of their Sanguine Ichor on top of one another.
-
The boss will remain stationary during the cast, allowing the tanks to also move out of line of sight.
-
Don't worry about the Sanguine Ichor damage, as having multiple pools on one location deals the same damage as only having a single pool at that location.
-
Once the pools have been spawned, all players can return to the boss and resume standard positioning.
-
On the second cast of Earsplitting Shriek, all players can simply place their pools on the other nearby pillar.
-
At the end of phase two, both of these pool locations will be clear, allowing the group to use the same positioning throughout all phase ones.
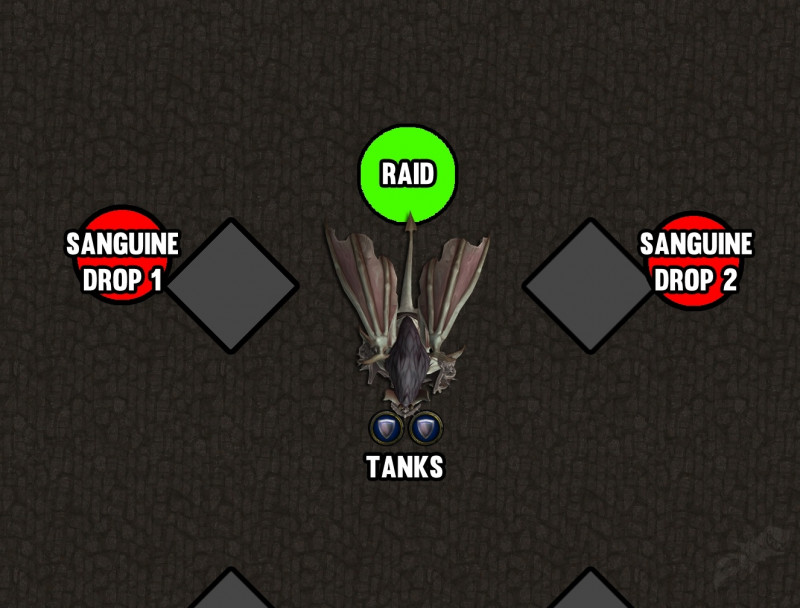
This positioning is ideal, as it allows two easy hiding spots without having to move the boss!
If your healers are comfortable, you can also just place the second ![]() Sanguine Ichor pools on top of the location the first ones are placed in.
Sanguine Ichor pools on top of the location the first ones are placed in.
-
This keeps the room cleaner, but the raid will be taking more damage as they place the second wave of pools.
Note: In a previous version of the encounter, the Sanguine Pools were used to remove debuffs from players. This is no longer appears the case.
Echolocation
The boss will occasionally mark up to three players with ![]() Echolocation.
Echolocation.
-
8 seconds later, these players will be hit with
 Descent. A bat will land at their location and deal moderate physical damage to them and anyone else within 6 yards. This also spawns a pool of Sanguine Ichor.
 -
Players marked by this ability should simply move to the edge of the encounter space as to place the Sanguine Ichor pools in low traffic areas.
-
Descent is unavoidable, however Deadly Descent events triggered by other mechanics (such as sonic rings in phases one or two) can be dodged if the player moves quickly enough after being horrified.
-
That being said, a sanguine pool will always spawn, dodge or not. Therefore it is best that players avoid Descent triggering mechanics to the best of their ability to keep the room clean.
Exsanguinating Bite
Shriekwing needs to be tanked and will occasionally use ![]() Exsanguinating Bite on the primary target, dealing a moderate burst of physical damage and applying 10 stacks of the
Exsanguinating Bite on the primary target, dealing a moderate burst of physical damage and applying 10 stacks of the ![]() Exsanguinated debuff.
Exsanguinated debuff.
-
Each stack of
 Exsanguinated deals low physical damage every 1.5 seconds, whilst increasing physical damage taken by 10% and reducing incoming healing by 10% per stack.
 -
This makes the tank immune to healing when Exsanguinating Bite is first cast. Healers should ensure they are fully topped before the ability is used and the other tank should taunt as soon as the cast is finished.
-
Exsanguinated stacks drop off the player every 1.5 seconds, meaning that the tank will have their debuff removed after 15 seconds has passed.
 Blind Swipe
Shriekwing occasionally casts ![]() Blind Swipe towards a random raid member, dealing moderate physical damage in a 12 yard frontal cone.
Blind Swipe towards a random raid member, dealing moderate physical damage in a 12 yard frontal cone.
-
This does not track the location of the player, allowing everybody to sidestep the ability.
-
That being said, due to the low damage of the ability, having the raid take the hit and simply healing it up via efficient AoE healing spells is equally as viable and far easier.
-
Additionally, ranged players should stack 13+ yards away from the boss when this is cast as to avoid this damage.
(Spell #344111)
To keep the healers busy, the boss occasionally casts (Spell #344111) which deals an initial low burst of damage followed by a moderate damage dot over 16 seconds.
-
Healers should make sure that the raid is healthy before this damage comes in, as well as be prepared to use healing cooldowns when it aligns with other sources of raid damage, such as Earsplitting Shriek.
Shriekwing Phase Two Abilities and Strategy
 Blood Shroud
The boss gains energy over time. After approximately 110 seconds, the boss will gain full energy and transition into phase two.
-
The boss will teleport to the middle of the encounter space and cast Blood Shroud. Once complete, this gives the boss a large damage taken decrease whilst placing a 12 yard ring around her.
-
Any players who enter the 12 yard ring around the boss will be horrified for 4 seconds and be marked for a Deadly Descent after 5 seconds.
-
Deadly Descent deals very high, yet survivable, physical damage to anyone within the marked location.
Beta Test Note: It is currently unclear if the ![]() Deadly Descent spawns
Deadly Descent spawns ![]() Sanguine Ichor pools on Normal/Heroic. On, the most recent Mythic testing they did.
Sanguine Ichor pools on Normal/Heroic. On, the most recent Mythic testing they did.
Hide from the boss during phase two whilst dodging sonic rings!
The boss will then begin to wander and weave randomly amongst the pillars in the encounter space.
-
Players need to make sure they move out of her path as to avoid triggering a Deadly Descent.
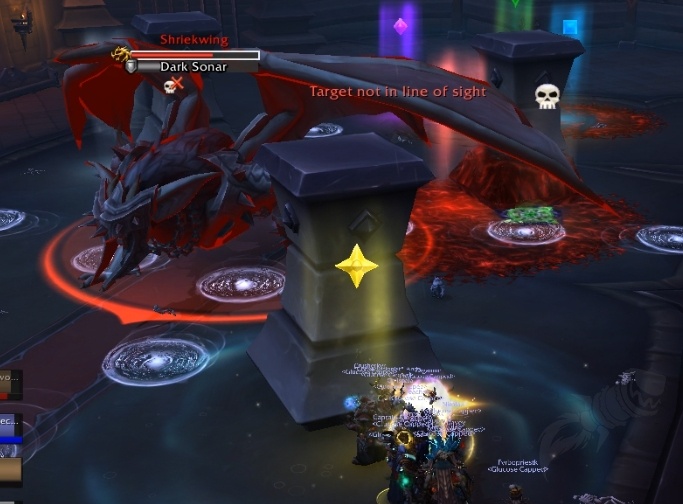
(Spell #340047)
Three times during phase two, the boss will cast (Spell #340047). This deals high damage to all players within line of sight of her whilst horrifying them for 2 seconds. This also makes the horrified players location for a ![]() Deadly Descent after 5 seconds.
Deadly Descent after 5 seconds.
-
Players should not only keep a good distance between themselves and the boss, as to avoid accidentally getting caught in her Blood Shroud radius, but they should also keep close to a pillar so that they can stay out of line of sight when this ability is cast.
-
We recommend that the raid remains around the two pillars that were not used for Earsplitting Shriek drop offs during phase one, as to reduce the need to path into Sanguine Ichor pools to avoid this mechanic.
Echoing Sonar
As the phase begins, several slow moving sonic rings will be released by the boss.
-
These will travel around the encounter space, bouncing off of terrain in an identical fashion to the rings produced by the Echoing Screech heroic ability.
-
Any player who comes into contact with a sonic ring will be horrified for two seconds and have their location marked for a Deadly Descent after 5 seconds.
-
All players should actively dodge these rings at all times.
-
You do not have to be hugging the pillar in order to maintain line of sight of the boss. If you need to move away from a pillar, feel free - just try and move in a direction that also keeps you out of sight for the bosses (Spell #340047) ability.
After approximately 40 seconds, the boss will drain all of her energy and return to phase one.
-
All patches of Sanguine Ichor will be removed at this time. Players should position themselves identically to the first phase one and rinse and repeat until the boss is defeated.
Heroic Shriekwing in Castle Nathria
Echoing Screech
On Heroic difficulty, twice every phase one, the boss will phase a random non-tank player and cast ![]() Echoing Screech.
Echoing Screech.
-
After a lengthy cast, the boss will spew forth several sonic rings in a "teardrop" shape.
-
These sonic rings will travel around the encounter space and will ricochet off of terrain until they despawn after approximately 15 seconds.
-
Any player who comes into contact with a sonic ring will be horrified for 2 seconds and have their location marked for a Descent after 5 seconds.
-
This mechanic can be dealt with in several ways, but the simplest is to have all non-tank players stack behind the boss whilst she is tanked in the position shown in the map diagram.
-
As soon as the cast begins, all players can move around the boss to one of her flanks. Due to the baited position, the sonic rings will despawn before they have a chance to reach the players location.
-
This minimizes the chance that any player is hit by a sonic ring and triggers a Descent drastically, keeping the room as clean as possible for phase two movement.
-
Alternatively, players can bait the cast in any direction and simply do their best to just dodge the rings as they bounce around, which can be difficult if they hit nearby pillars.
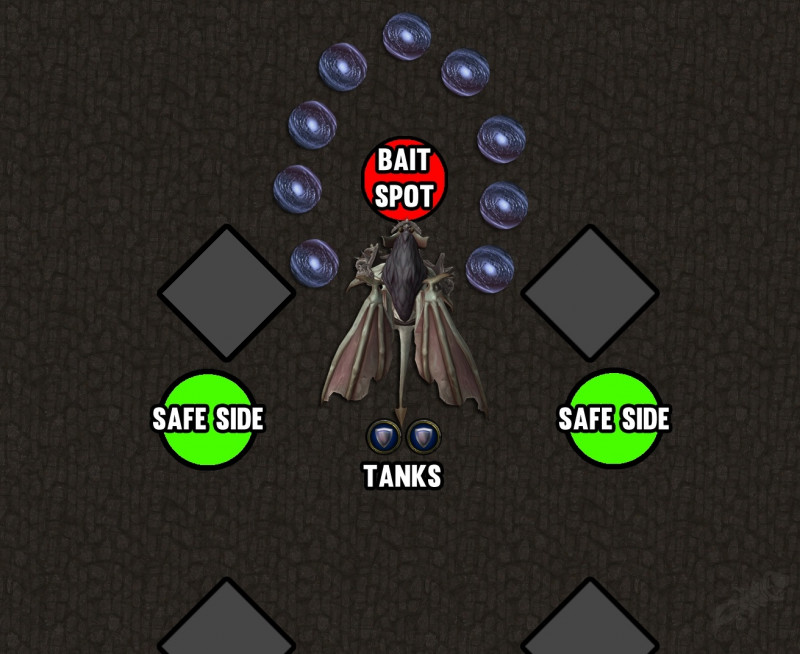
This positioning allows the raid to easily bait in one direction before moving to a safe flank of the boss!
Mythic Shriekwing in Castle Nathria
 The Blood Lantern
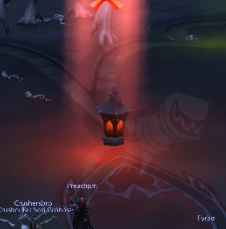
Click on the lantern to pick it up!
On Mythic difficulty, players will find a single Blood Lantern in the encounter space.
-
This lantern will periodically apply the 8 second long
 Bloodlight debuff to players when they are within 4 yards of it.
 -
Bloodlight deals moderate damage and allows players to see the sonic rings that spawn when the boss casts Echoing Screech during phase one and Echoing Sonar during phase two.
-
Without the Bloodlight debuff, the sonic rings are completely invisible on mythic difficulty.
-
Bloodlight will stack. This only increases the damage dealt to the player, so everybody should attempt to keep their Bloodlight stacks to reasonable levels (ideally below 5).
A single player can interact with ![]() The Blood Lantern by clicking on it. This makes the player pick up the lantern and carry it.
The Blood Lantern by clicking on it. This makes the player pick up the lantern and carry it.
-
Whilst held, the radius of The Blood Lanterns Bloodlight is extended to 14 yards.
-
Whenever the Echoing Screech is cast during phase one, a single player (ideally a mobile ranged player) should pick up the lantern and apply Bloodlight to the entire raid so that everyone is able to see the sonic rings.
-
Once the mechanic has ended and the sonic rings have despawned, the player should use their extra action button to throw the lantern to a target location nearby as to avoid giving the raid excess Bloodlight stacks.
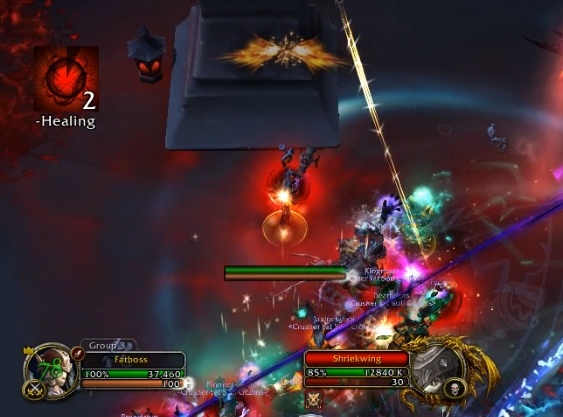
The player holding the lantern gives Bloodsight to all players within 14 yards!
During phase two, players should move around as a single unit, as to allow all players easy access to the ![]() Bloodlight stacks which will allow players to dodge the sonic rings during the phase.
Bloodlight stacks which will allow players to dodge the sonic rings during the phase.
-
You will need to ensure that players have the opportunity to very briefly drop their Bloodlight stacks during this phase, as otherwise healers will very likely fail to keep the raid alive.
![]() The Blood Lantern will shatter if it is hit by a
The Blood Lantern will shatter if it is hit by a ![]() Descent or
Descent or ![]() Deadly Descent.
Deadly Descent.
-
This will despawn The Blood Lantern and there is no way of getting it back aside from wiping.
-
Additionally, the entire raid will be horrified for 5 seconds and receive the
 Ravenous Horrors permanent debuff which deals incredibly high ticking damage, quickly leading to a wipe.
 -
As players need to be near The Blood Lantern for a good portion of the fight, this shatter mechanic gives yet another reason for players to dodge Descent triggering mechanics as much as possible.